January 14, 2011

Five-Cheese Macaroni with Ham


Macaroni and cheese is one of the most common comfort foods.  Some people swear by the version mom or grandma used to make, whereas others swear by the version that comes from a blue box, or perhaps the version served up as a side at that favorite rib shack, but in the US at least, if you ask people to list their go-to comfort foods, more people than not will list some take on mac and cheese. 

I've had a lot of good versions of mac and cheese over the years, but so far I haven't really found one I'd consider the "best" version.  That doesn't keep me from trying to find one, though. 

Most of the best versions I've tried have included a mix of different cheeses, so I figured that was a good place to start.  After considering several options, I went with sharp cheddar backed up with Colby for robust, cheesy flavor, plus mozzarella, Monterrey jack and American cheese for creamy texture and rich, more complex flavor.   I figured that mix of cheeses and a bit of seasoning added to a base sauce of butter, flour and milk ought to do the trick.

I went back and forth on whether or not to add some ham or bacon to the mix.  I've often liked versions of mac and cheese including either of those ingredients, but I've also disliked a few versions.   Ultimately I decided to go with just a bit of ham, enough to add an accent to the dish without dominating it. 

I ended up with a big pot of mac and cheese with rich cheese flavor and great texture.   I went a bit too heavy on the onion the first time around, so the amount listed below is dialed back from there, and should be just right. 

I'm going to continue my search for a favorite mac and cheese recipe, but this one is pretty good... maybe even good enough to be a personal favorite.   Give it a try and see for yourself.


Five-Cheese Macaroni with Ham

yield = 8 servings

1          pound uncooked macaroni (or cavatappi or similar pasta)
1          teaspoon salt + 1/2 teaspoon
3          tablespoons unsalted butter
1          tablespoon grated fresh onion
1/2       teaspoon garlic
6          tablespoons all-purpose flour
1          teaspoon dry mustard, dissolved in 1 teaspoon water
1          teaspoon freshly-ground black pepper
1/8       teaspoon cayenne pepper
2          cups whole milk
1/2       cup chicken broth
8          slices (approx. 6 ounces) American cheese
8          ounces extra-sharp cheddar cheese, shredded
4          ounces mozzarella cheese, shredded
2          ounces Colby cheese, shredded
2          ounces Monterrey jack cheese, shredded
1/2       pound ham steak, diced into 1/4" bits


Heat oven to 350 degrees.  Coat a medium-size (5 quarts or larger) Dutch oven with nonstick cooking spray.  Add 5 quarts of water and 1 teaspoon of salt to a stock pot and bring to a boil.  When the water comes to a boil, prepare the pasta per package directions.


Meanwhile, melt the butter in a large saucepan over medium heat.  When the butter is steaming, add the grated onion.  Cook 4 minutes, then stir in the garlic and cook 30 seconds.   Stir in the flour and cook until browned (about 1 minute), then stir in the mustard-water mixture, black pepper, cayenne pepper and 1/2 teaspoon salt.  Whisk in milk and chicken broth, bring to a simmer and cook 2 minutes. 

Add the cheddar, Colby, Monterrey jack and mozzarella cheese to a bowl and mix.

One slice at a time, tear bits off the American cheese and whisk them into the milk mixture.  When all the American cheese is incorporated, whisk in the cheddar cheese mixture, 1/2 cup at a time until it is all incorporated into the sauce. 


When the pasta is done, drain it and place it in the Dutch oven.   Add the chopped ham steak and the cheese sauce to the Dutch oven and stir with a rubber spatula to thoroughly mix.

Place the Dutch oven in the oven uncovered and cook 20 minutes.  Increase the oven heat to broil and cook 2-3 minutes or until the pasta-cheese mixture is lightly browned on top.  Remove from the oven and cool for a couple minutes before serving.

January 13, 2011

Basic Turkey Stock


After baking a turkey recently, I was left with a variety of leftovers.  I removed lots of turkey meat, including one complete breast, from the turkey, but that left me with the turkey carcass, which had a fair bit of meat still attached.  I divided the carcass into pieces and froze it, only to take it out of the freezer a week later to make turkey stock.

Turkey stock quite useful for soups, but it can also be used in place of chicken stock in any number of recipes.  My plan was to freeze a couple quarts of stock and use the rest to make a turkey soup of some sort.  I'll probably be using some of the frozen stock to make a turkey pot pie in the near future.

The following is a pretty basic recipe for stock.  It is tasty enough to stand on its own as a turkey broth, but it really shines when used as a base for other recipes.  It takes a little time, but most of that time is just simmering, with only minimal oversight necessary, and the result is well worth the time.


Basic Turkey Stock

yield = 4 1/2 quarts stock

1         carcass from a 18-20 pound turkey with ample
           amount of meat still attached, divided into sections
           to fit into a pot
2         large stalks celery, chopped course
1         large onion, peeled and halved
1         large carrot, peeled and chopped coarse
1         bay leaf
5         medium cloves garlic, peeled and smashed
1         teaspoon black peppercorns, slightly cracked
5         quarts water
2         cups dry white wine
5         sprigs fresh parsley
2         sprigs fresh thyme


Add the turkey carcass, celery, onion, carrot, bay leaf, garlic cloves and peppercorns to a large stock pot (12 quarts or more works best) along with the water and wine.   Bring to a boil, then reduce heat and simmer two hours, stirring occasionally.  Add the parsley and thyme, simmer two more hours, then strain the broth into quart-size containers.  Remove the meat from the solids and reserve for soup or other uses.  When the broth has cooled, remove and discard the fat from atop the broth.

Pasta with Apples, Walnuts, Brandied Raisins and Butternut Squash


Recently I tossed together a quick pasta dish completely from scratch... no recipe other than what I jotted down along the way, no reference to some other dish or recipe, etc.  I just selected a variety of ingredients I thought would go well together, tried to proportion them appropriately and tossed them together. 

I knew I wanted to saute some ingredients, then toss them with pasta to make a meal.  I also had an initial idea of some ingredients I wanted to use:  raisins, walnuts and squash. 

Raisins can end up mostly just tough and chewy, so I decided I'd soak the raisins in something flavorful.  Considering my options and what flavors might go well together, I decided to go with apple brandy, since I was already using sweet and fruit flavors.


I also knew squash can take awhile to saute, so tossing the cut-up squash in the microwave for a couple minutes would be a time-saving technique.

Giving thought to the walnuts, I decided I wanted them to serve as more than a bit of crunch, so I fried them in the oil before adding other ingredients, which I knew would permeate the oil in a nutty flavor and transfer a bit of that to the rest of the dish.

With those decisions made, the rest came to me pretty quickly.   I wanted a subtle and sweet undertone, nothing strong, so I went with one shallot instead of using an onion.  Garlic is pretty much a given.  I decided to toss in a chopped Granny Smith apple to add some tartness to provide a balance to the sweetness while sticking with the fruity flavor, and a bit of Parmesan to add a bit more of a nutty accent.   For pasta, I chose campanelle, knowing the bell-shaped pasta would be good for holding on to the small bits of other ingredients. 

Juli didn't like this one at all.  She didn't feel the different tastes blended well.  She also strongly disliked the flavor of the squash in this recipe, but I think that might reflect the squash more than the recipe, as I used chopped squash that had been frozen after being left over from making another recipe.  I thought the flavor was okay, if a bit subdued, but the texture of the squash did suffer a bit.


Pasta with Apples, Walnuts, Brandied Raisins and Butternut Squash

yield = 4 main-dish servings

3/4          cup golden raisins
1/2          cup apple brandy
12           ounces campanelle pasta
1             pound peeled and seeded butternut squash,
               chopped in 1/2 inch pieces
2             tablespoons extra-virgin olive oil
1/2          cup chopped walnuts
1             medium shallot, peeled and sliced thin
5             cloves garlic, thinly sliced
1/2          teaspoon freshly-ground black pepper
1/2          teaspoon kosher or coarse salt
1             Granny Smith apple, cored and chopped
1/4          cup grated Parmigiano-Reggiano cheese

Combine raisins and brandy in a small saucepan over low heat.  Slowly simmer until all the liquid is absorbed or cooked off.   Remove from heat and set aside. Start water boiling to prepare pasta according to package directions.

Place the chopped squash in a bowl and cover tightly with plastic wrap.  Microwave 3 minutes.  Remove from the microwave and set aside.

In a large skillet, heat two tablespoons oil over medium heat.  When the oil is shimmering, add the walnuts and cook, stirring frequently, until they have started to brown.  Add the squash and shallot and cook, continuing to stir frequently, until the squash has started to brown. Add the garlic and cook one minute, then stir in the raisins and cook until heated through.   Remove from the heat and stir in black pepper and kosher salt.

Drain pasta.   Add the pasta, skillet contents and chopped apple to a serving bowl and toss to combine.  Top with Parmigiano-Reggiano and serve.

January 12, 2011

Pizza Bread


When I was a child, my mother would occasionally make pizza bread.   She'd buy a loaf of crusty bread from the supermarket bakery, cut it in half lengthwise, spoon on some pizza sauce from a can, sprinkle with some mozzarella, layer on some pepperoni and toss it in the oven.   About fifteen minutes later, dinner would be served... big slices of thick bread topped with steaming-hot melted cheese.

As a kid I loved that, and it became something of a comfort food.  Unfortunately, as I grew into adulthood and had more experience with how good pizza could be, the pizza bread just wasn't that impressive any more.  I'd still try to recapture that childhood magic every now and then, but the results were always disappointing, and increasingly so over time.  Soggy bread, ketchupy sauce and toppings prone to sliding off onto your plate (or lap) just didn't have the same charm anymore. 

Recently, I started thinking about that old comfort food that I hadn't had in over a decade, and wondering if I could put together a version that was actually good, without the rose-colored lenses of nostalgia. 

I'm happy to report success. 

Going into the project, I knew the biggest hurdle was going to be preventing the sauce and ingredients from making the bread all soggy.  I gave this a fair bit of thought and came up with three ideas.  First off, I'd lightly toast the bread before topping it.  This would hopefully remove enough moisture from the bread that it wouldn't become too soaked, yet not leave it dried out.  I also decided to forego canned or cooked sauces, going instead for well-drained canned tomatoes and a bit of seasoning.  The tomatoes would give off a bit of juice, but their being chunky should help keep the bread from getting too soggy.  That just left the toppings, and it was a no-brainer to go with some of the tips included in the article on Foolproof Thin-Crust Pizza from the newest issue of Cook's Illustrated (January/February 2011):  Go light on the toppings, microwave vegetables for a minute or two with a bit of olive oil and briefly poach the meats to remove excess fat while leaving the meat moist and tender.  These had worked great with the Thin-Crust Pizza, so I figured they'd help in this case to keep the bread from being a limp, soaked mess.


It worked like a charm.   From start to finish, the pizza took less than 40 minutes.  The crust was nice and crunchy on the outside, while the bread beneath the sauce and toppings was still firm without being either dry or the least bit soggy and the sauce, cheese and toppings stayed on just fine.  The childhood memories were still there, and always will be, but I'm happy to finally have a version of pizza bread I can enjoy in the here and now, as an adult. 


Pizza Bread

yield = 4 main-dish servings

1            large loaf of crusty bakery bread (Italian or French would be ideal)
1            28-ounce can petite diced tomatoes
1            clove garlic, finely minced
1/2         teaspoon dried basil
1/4         teaspoon salt
1 1/2      cups shredded mozzarella cheese
2            ounces fresh mushrooms, thinly-sliced
1            teaspoon extra-virgin olive oil
2            ounces loose Italian sausage
2            ounces pitted kalamata olives, halved
3            tablespoons finely-grated Parmigiano-Reggiano cheese
1/2         teaspoon dried oregano

Slice the bread in half lengthwise.  Place the two halves on a baking sheet, place in the oven and heat to 400 degrees.  When the oven reaches that temperature, remove the bread from the oven and set aside.

Drain the tomatoes in a strainer and stir a few times to release excess moisture.  Set aside

Meanwhile, bring a cup of water to a boil in a small saucepan.  Add the sausage in small chunks (or rolled into small balls) and cook 4 minutes.  Drain and set aside.

While the sausage is cooking, add the mushrooms to a medium bowl.  Add the olive oil, toss to distribute it, then cover the bowl with plastic wrap and microwave 90 seconds.  Set aside.


Evenly spread half of the tomatoes over each half of the bread.  Sprinkle with garlic, basil and salt, then top each bread half with 3/4 cup mozzarella.   Arrange the mushrooms, sausage and olives, then sprinkle evenly with the Parmigiano-Reggiano and oregano.


Place the sheet with the bread halves back in the oven and cook until the cheese is melted and bubbling and the bread crust has turned deep brown.  Remove from the oven.  Transfer the bread halves to a wire rack to cool for a few minutes, then place on a cutting board.  Slice into four even servings, either leaving each quarter-loaf as a single piece or slicing it into smaller pieces, if you prefer.  Serve.

January 11, 2011

Snowed In


There are times when living in a small town a fair ways from where one works is not very convenient, and the last two days has been one of those times.   When the weather is bad, a snowstorm that means what might be simply a slow drive home for someone in the city can be treacherous for someone who lives nearly an hour from the city and who has to rely on county roads which, often as not, don't get plowed very well.

This winter hasn't been nearly as bad as the last one, but winter weather can still be a bit of a pain.  Juli and I left work early yesterday in order to get  home before the roads got dreadfully bad.  We weren't sure what things would be like today, but when we woke up, we found that while the roads were merely listed as 100% snow and ice covered, there was also a towing ban in effect, and the nearby school districts had all called off classes for the day.  We also found that we were completely snowed in.   In addition to several inches (I'm guessing about seven) on the ground, it was still snowing, and the street crews had plowed a few feet of snow and slush - which had frozen  to ice - at each end of our driveway.  

We weighed whether or not to struggle through that and brave the drive into work, as the Highway Patrol had not downgraded the road conditions to "travel not recommended,", but the TV news said that while the snow was supposed to taper off by midday or so, the wind was supposed to pick up, likely causing blowing and drifting snow.   There hadn't been much wind to that point, which is the main factor that had kept the weather from being as bad as it could have been, but since that looked likely to change - possibly stranding us in town or making for a very treacherous drive home, assuming we made it in without mishap - we decided to just use some of our vacation time for a snow day today.

On the positive side, that gave me a chance to do some cooking.    We hadn't done any significant amount of "getting ready to ride the storm out" shopping, but a quick check of the fridge, freezer and cupboards told me there were lots of things I might make with what we had on hand.


The first thing I did today was make a batch of Cook's Illustrated's Best Blueberry Muffins, which I've made and written about before.   Once again, they turned out flavorful, moist and just plain wonderful.  One of our neighbors came by as I was just putting them in the oven.  This gentleman makes a practice of bringing his snow blower around and clearing off people's walks, and in thanks for his being a good samaritan, we sent him home with four of the muffins, still warm from the oven, for him and his wife.


For lunch, I made up a batch of my Chunky Marinara Sauce and mixed it in with some meatballs and pasta.  I had several boxes of pasta containing just a few ounces apiece, so I cooked up three of them - campanelle, cellentani and farfalle (bells, spiral macaroni and bowtie pasta) - mixed together in the same pot.   The mix of pastas cooked up fine, with none over- or under-cooked, and the sauce turned out just as good this time as it has in the past.


When I started making the sauce, though, I realized there was a typo in the version of the recipe I originally published.  It's a somewhat obvious one - I listed 1/4 tablespoon of grated sharp cheddar cheese as an ingredient, when it should have said 1/4 cup - but in case anyone was confused, I've corrected the original, and I reprint it below as well. 

For dinner, I'm planning to make a mild lamb curry.  Right now it appears the weather will have died down sufficiently by the evening that road crews should be able to get things cleared up pretty well overnight, so we probably won't have any real problem getting in to work tomorrow morning.   That's good, but for today we mostly got to stay in, take it easy and make - and eat - some great food.   All in all, that's not a bad way to be snowed in.


Pasta with Chunky Marinara Sauce

yield = 6-8 servings

1        28-ounce can crushed tomatoes
1        15-ounce can diced tomatoes, drained
5        quarts water + 1/2 cup
2        teaspoons table salt, divided
24      frozen meatballs (optional)
2        tablespoons extra-virgin olive oil
1        large onion, minced
2        teaspoons minced garlic
2        teaspoons dried oregano
1        6-ounce can tomato paste
1/2     cup red wine
1        teaspoon freshly-ground black pepper
1        teaspoon sugar
1/8     teaspoon crushed red pepper flakes
3/4     pound uncooked pasta
1/4    cup grated sharp cheddar cheese
2        tablespoons freshly-grated Parmigiano-Reggiano cheese
          + extra for serving
2        teaspoons dried basil

Heat the crushed tomato and diced tomatoes in a large saucepan over medium heat and cook until it has thickened significantly.  Add 5 quarts water and 1 teaspoon table salt to a large pot over high heat and bring to a boil.  (If you are making the dish with meatballs, preheat the oven to 350 degrees and arrange the meatballs on a wire baking rack set over a baking sheet lined with aluminum foil.  Place in the oven and cook for approximately 1/2 hour, or until done.)

Meanwhile, add the oil to a Dutch oven over medium heat.  When the oil is shimmering, add the onion and cook, stirring frequently, until it starts to brown.  Stir in the garlic and oregano and cook for about 1 minute, then stir in the tomato paste and cook another minute.  Add red wine and water and cook for 1-2 minutes, then stir in the sugar, black pepper, salt and red pepper flakes.

By that point, the tomato mixture should have cooked down enough.  Add the thickened tomato mixture to the Dutch oven, stir thoroughly, reduce heat and cook at a low simmer.

When the water in the large pot has come to a boil, add the pasta and cook according to directions.  At the same time, add the cheddar cheese, two tablespoons Parmesan cheese and basil to the Dutch oven and stir in.  (If you are making the dish with meatballs, stir them into the sauce at this time as well.)

Drain the pasta and serve topped with the sauce (and meatballs, if desired) and with grated Parmesan cheese, or mix the cooked pasta with the sauce (and meatballs, if desired) and serve.

Not Just for Thanksgiving, Part 3: Orange-Ginger Cranberry Sauce + Cloverleaf Dinner Rolls


When we recently cooked up a turkey, gravy, mashed potatoes, stuffing and sweet potatoes, we rounded out the meal with a couple other things.  One of them was cranberry sauce.

I've previously raved about the Gingered Cranberry Sauce recipe featured awhile back at one of our favorite blogs, Closet Cooking.  We've made that a couple times now, and loved it each time.  I planned to make it again to go with our most recent turkey feast, but at the last moment I realized I didn't have any fresh ginger root on hand, which is a rarity for us.  Since I'd have to fall back on ground ginger, I figured I might as well change up some other things and see how they worked out.  As happens, the recipe worked out pretty well.  The ginger flavor isn't as bold as in Kevin's recipe, but this results in a good balance between the ginger and orange flavors, with neither overwhelming the taste of the cranberries.

This recipe is something of an oddity for us in that instead of using sugar, I used Splenda.  I'm not a big fan of the various "healthy" alternatives to standard cooking staples like butter, eggs or, especially, sugar.   Having talked to dietitians and biochemists about the matter, I'm not convinced they're really healthier in the long run, as any benefits they might have in terms of reduced cholesterol or blood sugar are probably countered by the effects they have on appetite (fake sugars like Splenda trick your body into thinking it's getting a carb, and when that doesn't happen, your craving for sweets tends to increase), digestion and other systems.   Beyond that, many of the "healthy" alternatives taste pretty awful.   Regardless of possible risks (I'm not convinced either way, personally) stevia just doesn't cut it as a sugar substitute, in my opinion, and I've not yet found any situation in which margarine ends up being anything but a really pale (and dreadful-tasting, more often than not) substitute for butter.   I think you are better off eating a balanced diet, exercising reasonable portion control and using quality ingredients than you are going with synthetic foods and the health craze of the moment.

As for Splenda, a lot of the time you can taste the difference, and it is pretty much worthless for baking (it doesn't react to yeast, it doesn't brown, it doesn't really caramelize) and completely worthless for canning, so I mostly avoid it.  In my experience, it works well mostly in foods with a prominent sour element, such as yogurt.  Similarly, it works okay with cranberries, probably because the tartness masks any off flavor, and since I had some around, I decided to use it to make this batch of cranberry sauce.  You'll get results just as good with regular granulated sugar, though.


Orange-Ginger Cranberry Sauce

2       cups fresh cranberries
1       cup Splenda No Calorie Sweetener (or granulated sugar)
3/4    cup water
1/4    cup orange juice
2       teaspoons orange zest
1       teaspoon ground ginger

Combine all ingredients in a large saucepan.  Bring to a boil over medium-low heat.  As berries start to burst with the heat, press them against the side of the pan to smash them and help the fruit break down into a sauce.  When most of the berries have been smashed or burst, remove from heat.  Allow the sauce to cool for a few minutes, then transfer to a serving bowl and cover tightly with plastic wrap until you're ready to serve.


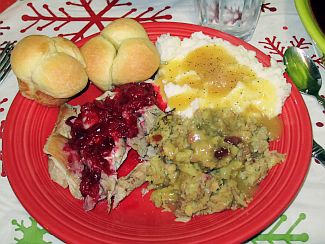
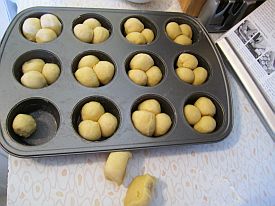
I also made up a batch of Classic Cloverleaf Rolls, using a recipe from the October/November 2010 issue of Cook's Country.  These simple, classic dinner rolls are pretty easy to make, and while they take a little time to prepare (two periods of rising), you can do something else during most of that time, and the time and effort are more than worth the results.  These rolls bake up crisp on the outside, light and buttery on the inside and just plain tasty.   They went along great with the rest of the meal.
Classic Cloverleaf Rolls, Cranberry-Apple Stuffing, Turkey
Roasted in a Bag, Orange-Ginger Cranberry Sauce, Mashed
Potatoes and Turkey Gravy. 
Not Pictured: Sweet Potatoes with Coconut and Pecans

January 10, 2011

Not Just for Thanksgiving, Part 2: Baked Sweet Potatoes with Coconut and Pecans, Revisited


In addition to a roast turkey, stuffing, potatoes and gravy, rolls and other yummy stuff, we decided to fix a sweet potato dish.  Thanksgiving or not, sweet potatoes just seem to go well with this sort of meal.  Besides, this provided me a good opportunity to revisit one of my original recipes.

I first wrote about Baked Sweet Potatoes with Coconut and Pecans a few months ago.  In preparing the dish this time around, I came up with an idea for making it even better.  I've gone back and edited the original post to reflect this improvement, but I'm also taking the opportunity to present it again.

In the original version, the dish simply cooked in a covered Dutch oven.  This resulted in a moist, flavorful dish, but as I prepared it this time, I realized it was perhaps too moist, since the lid prevented any of the cooking liquid from escaping.  I realized that taking off the lid partway through would let some of the liquid cook off, which would thicken the sauce and make it more flavorful via carmelization.  Sure enough, baking it for 45 minutes, removing the lid and baking it an extra 30 minutes resulted in a better, more flavorful version of the recipe. 

So, here's the new, improved version of this dish.  Enjoy.  We sure have!


Baked Sweet Potatoes with Coconut and Pecansyield = 6-8 ample servings4       pounds sweet potatoes, peeled and cut into bite-size chunks
1/2    cup chopped pecans
1/2    cup flaked, sweetened coconut + 2 tablespoons for serving
1/3    cup granulated sugar
1/3    cup packed light brown sugar
1/2    teaspoon ground cinnamon
1/4    teaspoon salt
1/2    cup coconut milk
1/4    cup butter, melted

Preheat oven to 375 degrees.  Prepare a large Dutch oven with cooking spray.

Add sweet potatoes to the Dutch oven.  Mix together pecans, sugars, cinnamon and salt and spread atop the sweet potatoes.  Add the coconut milk and melted butter.  Cover tightly and bake for 45 minutes, then remove the lid and bake uncovered for an additional 30 minutes.  Transfer to a serving bowl, sprinkle with two tablespoons coconut and serve.