January 03, 2011

Shopping in Des Moines: allspice

Right before Christmas, Juli and I did some shopping in the East Village area of Des Moines.  We go there fairly often, as two of our favorite shops are located in that area.  Kitchen Collage is one of our go-to places when it comes to various sorts of kitchen utensils, small appliances and so forth.  It's where we purchased our knives and cutting boards, among other things.  Gong Fu Tea is, quite simply, the best place to purchase tea in Des Moines.  They feature a wide range of excellent teas and teaware.

This time around, though, we checked out something different:  Des Moines' newest spice store, allspice.


allspice (yes, they spell it in all lower case letters) sells a wide range of herbs, spices, chilis, infused olive oils, balsamic vinegars and more.  The store advertises itself as a "100% local and family owned business."  It opened in September 2010.  We can vouch for the store's claim that their spices, chilis, rubs and so forth are freshly ground/mixed and packed, because we saw two of the employees doing just that during our visit.


One of its more notable features is Iowa's first olive oil and balsamic tasting bar.   A good part of the store is taken up by displays of the numerous oils and vinegars.  Each is in a big, shiny stainles steel cask with a spigot, which one can use to fill a bottle for purchase, or to sample the various wares.  allspice sells a lot of different flavors of high-quality olive oil and balsamic vinegar.  The citrus-infused olive oils and one which included Asian sesame oil were among the stand-outs, though more standard herb-infused varieties also had excellent flavor and aroma.


We didn't purchase much during our initial visit to allspice, but not for lack of interest.  That late during the Xmas shopping season we were running a bit short on money, so we decided to minimize our purchases on this occasion.  All we picked up this time around were a pair of colored salts (pink and black), which we figured would make for a nice presentation with special dishes, and a jar of black sesame seeds.


We'll be returning to allspice soon, though.  Juli and I have both been thinking about dropping by and picking up a selection of their olive oils.

Allspice is located at 400 East Locust in Des Moines.  The store hours are Mon-Fri 10-6 and Saturday 10-4.  You can check out their website at http://www.allspiceonline.com/.   There isn't a lot at the website yet, but we're looking forward to that changing.  There's lots good at the store already, though, so check it out.

Zucchini with Chili-Orange Glaze


I wanted to make an Asian-flavored vegetable dish to go with my Shrimp Pad Thai.  The grocery had some pretty good zucchini, so I decided I'd use my grill pan to cook up slices of zucchini with a flavorful glaze. 

Coming up with the glaze took me about a minute of thought, if that, since I knew the flavor I wanted and what ingredients would give me that.  The harder part was building up the courage to cook this on my grill pan.   Even though I've seasoned it quite well, the amount of cleaning necessary to rid cast iron of burnt-on sticky-sugary stuff can play havoc on the seasoning layer of a cast-iron pan. 

The zucchini turned out great - firm yet tender, with nice grill marks and great flavor thanks to a tangy-sweet glaze - and it went well with the Shrimp Pad Thai.  And as it turns out, I didn't have to be so worried about my grill pan's seasoning.  Most of the burnt-on stuff flaked off with light pressure from a metal spatula, and the rest cleaned off easily enough by scrubbing it with salt and hot water.  It actually took more work to clean out theTramontina skillet I used to cook up the Pad Thai (though that also cleaned up great). 

Zucchini with Chili-Orange Glaze

yield = 3 servings

3        tablespoons orange marmalade
1        tablespoon tamari
2        teaspoons chili paste
2        small zucchini

Add the orange marmalade, tamari and chili paste to a small bowl.   Stir to combine, then set aside.


Lengthwise, slice away a thin layer of the outer skin on two opposite sides of each zucchini.  Cut each zucchini lengthwise into three long, flat pieces. 
Heat a grill pan over medium high heat. While the pan heats up, season both sides of the zucchini slices with salt and pepper to taste.


Arrange the zucchini slices on the grill pan and cook for about 4 minutes.  Flip the zucchini, cook for about 3 minutes, then brush the zucchini slices with the glaze.  Cook for 2 minutes, then transfer to a serving plate and serve hot.


Notes:
This dish can be made on an outside grill.  Simply place the zucchini slices over direct, medium-high heat and follow the directions as written. 

Tamari is a stronger-tasting, thicker type of soy sauce.  It has more intense soy flavor and does not include wheat, as often do the typical grade of soy sauce.  If you can't find it, you can use regular soy sauce, but tamari's rich flavor makes it well worth any time and effort put into finding it.

January 02, 2011

Holiday Gifts and Other New Arrivals

This Christmas season, we got a lot of cooking-related gifts, and we also purchased some kitchen-related items for ourselves. 


Almost all of my gifts this season were kitchen-related, which is just fine with me.  Some of the stand-outs include an immersion blender, a mandoline slicer and three new cookbooks.   The cookbooks are the new edition of the America's Test Kitchen Family Cookbook, which features a new section of cookware ratings; The Best 30-Minute Recipe, also by the ATK folk; and Perfect One-Dish Dinners by Pam Anderson (the food writer, not the actress).  I've already made one dish featured in the Family Cookbook and used it to research ways of fine-tuning a couple of my own recipes.  It contains a lot of great stuff, including the cookware ratings section mentioned above, lots of product reviews and recommendations based on ATK taste tastes, which are sprinkled throughout the book, sidebars featuring helpful cooking tips, a table listing lengths of time for microwaving and steaming various vegetables and, of course, lots and lots of great recipes - more than 1200 in all, according to the book's cover.  So far I've only glanced at the other two books, but I expect to get a lot of use out of both of them.


The Christmas gift Juli's gotten the most use out of has been her Keurig B30 Coffee Brewer and a variety of K-cup packs for use with the Keurig.  It brews up a cup of coffee (or tea, or cocoa) in very little time and with no mess, which is great for busy workday mornings.  She'd been wary of buying one of these, as the reviews have not been uniformly spectacular, but so far this model has worked like a charm.  The K-Cup Carousel has been quite useful at keeping a selection of the little K-cups organized and ready.


Another stand-out recent arrival is my Lodge Enameled Cast-Iron 3-Quart Covered Casserole, which I purchased in emerald green.  It is quite nice, as it serves well as a back-up skillet and can go from stove top to oven without a problem.  It has already seen a fair bit of use the past few days.  Like all the Lodge enameled products, it heats uniformly and conducts heat wonderfully, and it cleans up from even the most sticky, burnt-on mess with virtually no effort at all. 


The biggest new arrival to our kitchen is our new Cuisinart 5.5-Quart 12-Speed Stand Mixer.  It wasn't a Christmas gift.  Our old KitchenAid mixer had served us quite well, but it was on its last legs, and I've been using a stand mixer an awful lot of late, more than enough to justify the purchase.  We picked ours in a spiffy-looking black finish.  It works like a charm - I've already used it to beat egg whites and make cookie frosting - and when we have a bit of spare cash, I'm looking forward to purchasing one of the optional attachments:  a meat grinder/sausage-maker.  That will have to wait for awhile likely as not, though... maybe a birthday present down the road.  We wouldn't have bought the mixer yet, but it was recently on sale at Amazon for a great price. 


One smaller, but nonetheless quite useful, addition to my bakeware collection is the Chicago Metallic Non-Stick Slice Solutions Brownie Pan with Lid.   It's a nonstick baking pan with a bottom insert that allows you to lift everything out of the pan, and another insert which allows you to bake up brownies, bars and what have you pre-sliced.  This came in quite helpful recently when I made up another batch of the Blackberry Bliss Bars featured in the most recent issue of Cook's Country.  They were a big hit at Thanksgiving, and just as welcome the second time around, and the pan's tight-fitting lid kept them fresh more than long enough for us to finish them off.


We also got a gift certificate for Penzey's from my son, which has of course been a great gift for us.  He also gave us a gift certificate for Half-Price Books, knowing that we both like to read - and that Half-Price has a large cookbook section, of course!

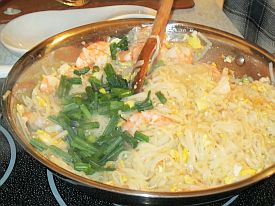
Shrimp Pad Thai


A long, long time ago, I lived in Oklahoma City.  As culinary adventuring goes, OKC didn't really have a lot to offer, but there was one restaurant I really, really loved:  the Bangkok.  It was a family-run restaurant, launched by a Fred Evans and his lovely and charming wife, Lida.  Back when I ate there, they and their children were very involved in the day-to-day running of the restaurant, which featured the family's own recipes, most of them developed (and usually cooked) by Lida.  The food was truly delightful:  Authentic Thai cuisine done right.  It's still among the very best Thai restaurants I've ever found. 

From doing some online research, I've learned that the Bangkok is still around, but that Fred and Linda sold it.  Reviews suggest that while it's still pretty good, the quality has - predictably - slid somewhat.  Thankfully, I've got a copy of the cookbook the Evans family put out for their customers (a photocopy, actually; my first wife has the original).  This was the first Thai cookbook I've ever owned, and it is still probably the best.

I haven't made Pad Thai in a long time, but I used to make the version included in the Evans' cookbook.  That recipe is written for a single (albeit ample) serving, as follows:

PAD THAI

1/4          pound rice noodles
5             shrimp, shelled and diced
1             egg, lightly beaten
1             cup bean sprouts
1             tablespoon ground peanuts, roasted
2             tablespoons vinegar
2             teaspoons sugar
2             tablespoons nampla (fish sauce)
4             tablespoons vegetable oil
1/4          cup green onions cut one inch long
1             teaspoon Dried Chili Peppers (optional)

Soak the rice noodles in warm water for about 20 minutes.  Drain.  In a hot fryng pan or wok put vegetable oil.  Then stir fry egg and shrimp until done.  Add noodles and fry until brown; then add nampla, vinegar, sugar and mix.  Add peanuts, bean sprouts, coriander leaves or green onions and stir fry until bean sprouts are cooked.  Put on serving plate and sprinkle Dried Chili on top, if you like it spicy.

(Source:  Oklahoma City's Bangkok Restaurant Cookbook, by the Evans Family, 1990)
(Note:  The mention of Dried Chili Peppers refers to roasted red chilis ground in a food processor, which the Bangkok included among its various garnishes)

That's an excellent Pad Thai recipe.  I've made it several times.  I've found from experience, though, that tryng to make up multiple servings at once is more than a matter of doubling (or quadrupling, or whatever) the ingredients.   Doing that results in soggy noodles and egg chunks, overcooked shrimp, mushy peanuts and limp bits of green onion, with the whole mess tasting unpleasantly fishy and vinegary.  So, I used the Evans' recipe as a starting point for making one of my own, capable of serving three or four people without sacrificing texture or flavor.

I knew from past experience that to do that, I'd have to vary the proportions of some ingredients and change the order in which some of them - most notably the shrimp - were added.   If you try to cook that many noodles after the shrimp is already cooked, the shrimp will end up with a texture resembling pencil erasers.  I'd need to use a lot less liquid to avoid making everything soggy as well, since lots of liquid doesn't absorb or cook down as quickly as smaller amounts.  So, after giving the matter some thought, I tossed together a recipe and gave it a try.

I'm pleased to report success.  My first try at this turned out a great pad thai, with firm noodles and lots of flavor.  Juli and I both liked it quite a bit.  Should the Evans family happen to hear about this, my hope is that they'd be pleased.   Their cooking certainly inspired me.

One of these days I'm going to have to give their homemade ice cream recipes - particularly the coconut and rum varieties - a try. 

Shrimp Pad Thai

yield = 3 generous or four modest servings

12             ounces rice noodles
5               tablespoons peanut oil
3               eggs, lightly beaten
10             ounces peeled, deveined shrimp
2               cups bean sprouts
8               green onions, white parts separated, with
                 white parts thinly-sliced, green parts sliced
                 in 1/2-inch pieces
1/4            cup unsalted, dry-roasted peanuts, coarsely
                 ground
2               teaspoons Asian (dark) sesame oil
6               tablespoons fish sauce
3               tablespoons rice vinegar
6               teaspoons sugar
1               tablespoon chopped cilantro leaves
1               tablespoon crushed red pepper flakes, roasted (optional)


Soak the rice noodles in hot water for 20 minutes.  Drain, then set aside.


Heat the peanut and sesame oils in a large skillet at medium-high heat.  When the oil is shimmering, add and stir-fry the egg.  When the egg is done, add the rice noodles and stir-fry.   After about 3 minutes, add the shrimp, the bean sprouts, the white parts of the green onion, the peanuts and sesame oil.  Continue to cook, stirring often. 


When the noodles have started to brown, add the green parts of the green onions,  fish sauce, rice vinegar and sugar.  Cook until the shrimp is done and most of the liquid has boiled off. 

Transfer to a serving platter and sprinkle with the chopped cilantro (and the red pepper flakes, if desired).

Shrimp Pad Thai and Zucchini with Chili-Orange Glaze

January 01, 2011

First Breakfast of the New Year: Pear Fritters with Lemon and Ginger, from Fine Cooking


Our New Year's celebration consists of a three-day weekend (Friday through Sunday).  Neither of us works on Sunday, which is a rarity for us, but we figured we'd go ahead and take off the whole weekend, since today is our eighth wedding anniversary.  I've been spending the bulk of the time in the kitchen, with some assist from Juli.   I'll be reporting on all the great cooking we're doing in the days to come, but I wanted to share what we had for breakfast on the first day of 2011. 

The latest issue of Fine Cooking (December 2010/January 2011) featured an informative article about pears - different types, their flavors and textures and which serve best for different sorts of cooking - and several recipes.  The recipe that caught my eye was for Pear Fritters with Lemon and Ginger.   Balls of tasty, moist dough made with ginger, lemon zest and diced pears, deep-fried then rolled in cinnamon-sugar... not exactly diet fare, but it sounded good for a holiday breakfast.  So, I tried out the recipe today.


I should note that I made a few changes from the recipe as written.  The written recipe called for both fresh lemon zest and freshy-grated ginger.  I love both, and normally I would have used those, but I wanted the pear flavor to dominate and I was also worried about the dough being too moist, so I used smaller amounts of powdered ginger and lemon zest while bumping up the amount of pear by adding an extra half pear. 


This recipe gave me a chance to try out something I got for Xmas:  a clip-on thermometer for use in deep frying, making candy and so forth.  I clipped it to the side of my small Tramontina Dutch oven, added a couple cups of canola oil and heated the oil.  When it was ready, I dropped groups of two-tablespoon globs of the dough (scooped out with a cookie scoop) into the hot oil, fried them until golden-brown, then transferred them to a plate lined with paper towels.  They were then rolled in the cinnamon sugar, and a few batches later, they were ready to eat.


These really were quite tasty.  They were so moist inside, I initially questioned whether they'd cooked through, but examining one showed that yes, they were done, but the bits of pear provided a lot of moisture.  The fritters were quite fluffy, due to well-beaten egg yolks having been carefully folded into the dough.  Our new Cuisinart stand mixer did a great job of beating the egg whites all nice and fluffy.


All in all, these fritters made for a pretty good breakfast.  I had mine with hot cocoa and a glass of milk, while Juli had coffee with hers.  We both thought this a pretty good start to a New Year.

Vegetable Curry with Winter Squash


This post features the second dish I made for our supper on Christmas day, to accompany Lamb Curry with Apricots.  As I noted when posting about the lamb curry, when making a curry dinner, I usually like to make two dishes:  One featuring meat, poultry or seafood plus a vegetarian curry.  In designing the second dish, I decided to come up with something that would feature red kuri squash.

The kuri is a thick-skinned winter squash with a bold red-orange color.  It looks something like a small, red pumpkin, but without the ridges.  Beneath the skin is the delicious, bright orange flesh. 


Kuri is our very favorite type of squash.   Its sweet, nutty flavor beats out even butternut, and you can use it for just about anything you might use any other type of squash for.  Soups, stews, stir-fries, casseroles, breads... even pies.   It's also ideal for stuffing. 

I decided that rather than make a dish featuring nothing but the kuri, I would make it the centerpiece of a curry including tomatoes, peas, chickpeas and coconut milk, while keeping the amounts of each other ingredient modest, to make sure the kuri would take center stage.   I'd have to say I succeeded.

The dish was sweet and tasty, with a slight undercurrent of heat provided by some chili powder and a single, medium-hot Serrano pepper.  The cubes of kuri squash were firm, yet tender, and the bit of acidic undertone provided by the tomato provided a nice counterpoint to the nutty-sweet squash.  This curry stood well on its own merits, and went along well with the lamb and fruit curry I'd paired it with.


We haven't noticed any kuri in the stores lately, and we have only a couple left from the several we bought at the end of farmer's market season.   I'm not sure yet what we'll use them for, but a second batch of this curry is a fairly good bet.

Vegetable Curry with Winter Squash

yield = 6 servings

2         tablespoons vegetable oil
1         large onion, chopped fine
1         Serrano chili, seeded and minced fine
1         tablespoon peeled, minced ginger
2         teaspoons minced garlic
1 1/2   teaspoons chili powder
1         teaspoon ground cumin
1/2      teaspoon coriander powder
1/2      teaspoon black mustard seed
1         kuri squash, peeled and diced into 1/2 inch pieces
1         15-ounce can chickpeas, drained and rinsed
1/2      15-ounce can diced tomatoes
1/4      teaspoon salt
1         cup coconut milk
1         cup frozen peas, thawed
2         tablespoons chopped cilantro


Heat oil in a Dutch oven over medium-high heat until shimmering.  Add the onion and cook 2 minutes.  Stir in Serrano chili and cook, stirring often, until the onion starts to brown.  Add ginger and garlilc and cook 1 minute or until fragrant. 

Stir in chili powder, cumin, coriander and mustard seed and cook until fragrant.  Add squash and stir-fry 2 minutes.  Stir in chickpeas, tomatoes and salt and cook 3 minutes, then stir in coconut and 1 cup water.   Bring to a boil, then reduce heat to a low simmer and cook 30 minutes. 

Stir in peas, cook 5 minutes, then transfer to a serving bowl, garnish with chopped cilantro and serve.


Note: 
In place of a kuri squash, you can use another sort of winter squash.  A small butternut squash would work well in this recipe.